

How to Use the eOne Query Builder in Dynamics 365 Business Central
- John Ellis
- Apr 8
- 3 min read
Updated: 3 days ago

When it comes to business intelligence, anyone who has made the transition from Microsoft Dynamics GP to Business Central begins to miss the eOne Solutions SmartList Builder tool.
SmartList Builder allows even the lay user to easily pull data from any GP table.
Now, thanks to eOne’s Query Builder tool, users can pull data from any Business Central table with just as much ease.
Although the purchase of eOne’s Popdock is required to utilize Query Builder, this purchase will pay for itself once report designers see that they have a “one-stop shop” for reporting on any of Business Central’s data.
Too, users who do not have access to Business Central can instead be given access to Popdock lists (or reports) created through Query Builder.
Also, without Query Builder, there is no easy means of accessing Business Central tables.
Let’s say that you want to access amounts posted to Cost of Goods Sold, along with their sales invoice numbers and customer names.
From within Popdock, navigate to “Connectors”:

In this development environment, click the pencil icon to the far right of “Dynamics 365 Business Central – John Sandbox”:

On the left, under Settings, choose “Lists”:

Scroll down to find “Query builder” and click "Add list".
After entering a “Name”, click the tab button on your keyboard to default “Item name”, “Item singular”, and “API endpoint”. Next, choose the appropriate module for “Group”:

With this information entered, click the “Query builder” selection shown above.
Choose “Click here to add a table”:

From the “Table” drop-down list, choose “G/L Account” and click “Add table”:

In the “Edit list - COGS” window, click “G/L Account” to choose any of the fields shown on the right:

Within the G/L Account table that you added, click on “No.” On the right, choose “Click here to add a restriction”:

Not only does a drop-down list for “Type” appear in the Restrictions section on the right, but the “No.” field in the table now has a filter icon on its left:

In “Restrictions”, choose Equals for “Type” and enter the Cost of Goods Sold account number from the general ledger for “Value”:

Next, click “Add table”.
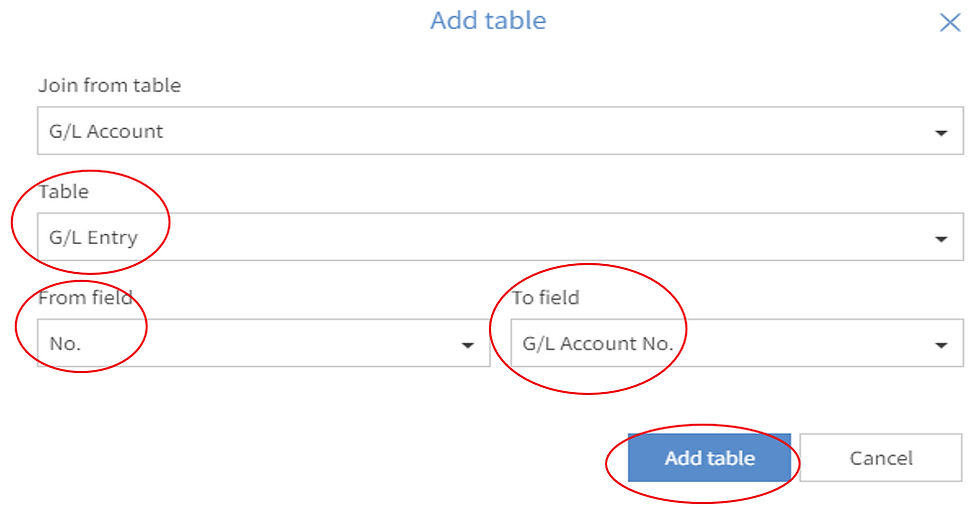
Here, you’ll search for G/L Entry within the “Table” drop-down list.
In “From field” and “To field”, you’ll choose the matching fields between the two tables to join them.
Next, click “Add table”.
(Again, those who know SmartList Builder in GP will be very familiar with this process.)
As you see here, you need to select fields for “G/L Entry”:

Once you click on “G/L Entry”, you can choose fields that appear for selection on the far right.
Choose “Amount”, “Document No”, “Posting Date”, and “User ID”. Your two tables will appear, as follows:

Now, you need to pull in customer data. Once again, click "Add table".
Here, you’ll search for “Sales Invoice Header” within the “Table” drop-down list.
In “From field” and “To field”, you’ll choose the matching fields between the two tables to join them.
Next, click “Add table”.

Now, in the “Fields” section on the right-hand side of the window, select “Bill-to Customer No.” and “Name”. Now, here are your three tables:

In “Actions” on the left, click “Publish”:

After waiting for the dialog box shown above to disappear, you should get a message reporting success:

Return to the Popdock home page by clicking the logo in the upper left corner.
In the top middle of the home page, click "Add new tab".

As seen above choose “Find by connector”, update the five fields, and click “Add”.
Now, you’ll be taken to your report layout, where you can add fields.

Begin by selecting “No.” and clicking "Add selected column" on the right.
Repeat this for the other fields to add:

Following is the result:

And you’re done!
For additional tips or assistance please feel free to contact us.
Turnkey Technologies, Inc. – Your Trusted Partner for Microsoft Dynamics Solutions
Kommentare